
SNMP based Vendor Device Adapter
This section provides details on how to use the SNMP Adapter framework to create an SNMP based Vendor Device Adapter (VDA).
The details on how to create/deploy the VDA was already covered in the section Creation and Deployment of Vendor Device Adapters and should be used to understand the basics of the Adapter framework, as creation/deployment of the core component is same regardless of the type of adapter (e.g., SNMP, SFTP).
An example for the SNMP based VDA is provided in the directory obbaa/resources/examples/adapters/protocol-translation-snmp.
An SNMP based VDA should perform the following tasks:
-
Convert the NETCONF message it receives from the BAA into SNMP Varbinds - Message conversion.
-
Perform the SNMP operation (e.g., Get, Set) using the constructed Varbinds on the target device - SNMP transport.
-
Receive and process the trap messages from the target (AN). Convert them to equivalent NETCONF notifications and send it to the BAA - Trap receiver.
Message conversion
Message conversion core logic would be different across different target devices. Though the configuration received by the SNMP VDA from BAA would be of standard NETCONF format, this needs to be converted to the format (SNMP Varbinds) that the device understands. The modelling of the Managed objects could differ for different devices as the implementation within the device could have used standard SNMP MIB definitions or proprietary definitions. So, to develop a generic component for message conversion is not the focus of this release. There are examples provided in the test implementation (class SnmpTransportTest) on how the varbinds could be formed from the incoming NETCONF messages. The vendors could use this as a sample and convert the NETCONF messages to the SNMP Varbinds based on their implementation (standard or proprietary).
SNMP Transport
-
This component/class is responsible for the SNMP transport. It creates an SNMP target device (with its details/credentials) and has APIs which could be used to perform SNMP operations. The following SNMP operations are supported,
a. snmpSet(VariableBinding varbind) - set an individual SNMP OID.
b. snmpSetGroup(List<VariableBinding> varbinds) - Set a group of varbinds.
c. snmpGet(VariableBinding varbind) - Get an object or table.
d. snmpGetNext(VariableBinding varbind) - Get next OID.
e. snmpWalk(String tableOid) - A sample implementation of an SNMP Walk.
-
Once the Varbind is built as a part of Message conversion, the adapter could use the above APIs to send those Varbinds to the target (AN).
-
The SNMP transport component supports SNMP versions 1,2 and 3.
-
To facilitate a device creation with SNMP credentials, new entities are added to the yang file bbf-obbaa-network-manager.yang, i.e., a leaf network-manager/managed-devices/device/device-management/device-connection/connection-model is added with a new enum value "snmp" and a corresponding new container snmp-auth is created.
-
The file README.md in the folderobbaa/resources/examples/adapters/protocol-translation-snmp, provides RPC examples for deploying the adapter, creation of SNMP v2/v3 devices and a sample test configuration.
-
The sample test configuration demonstrates setting of sys:location from ietf-system.yang, provided the target device has implemented the object sysLocation from the standard MIB, SNMPv2-MIB.
-
The SNMP Transport component uses SNMP4j library for the protocol functionality.
SNMP Trap Receiver
SNMP Traps are alert messages sent from an Access node to the VDA which is waiting for these notifications to be received. Typically, traps are received on port 162 (could also be on a different port).
It is necessary for the BAA to have a common trap listener, since there could be more than one SNMP based VDAs that receive traps from the respective devices. The SNMP trap listener should receive all the traps and forwards them to the right VDA for processing. The traps will be then converted into respective NETCONF notifications and forwarded to BAA. The following picture illustrates the class design of trap receiver functionality,
SNMP trap receiver has the following components:
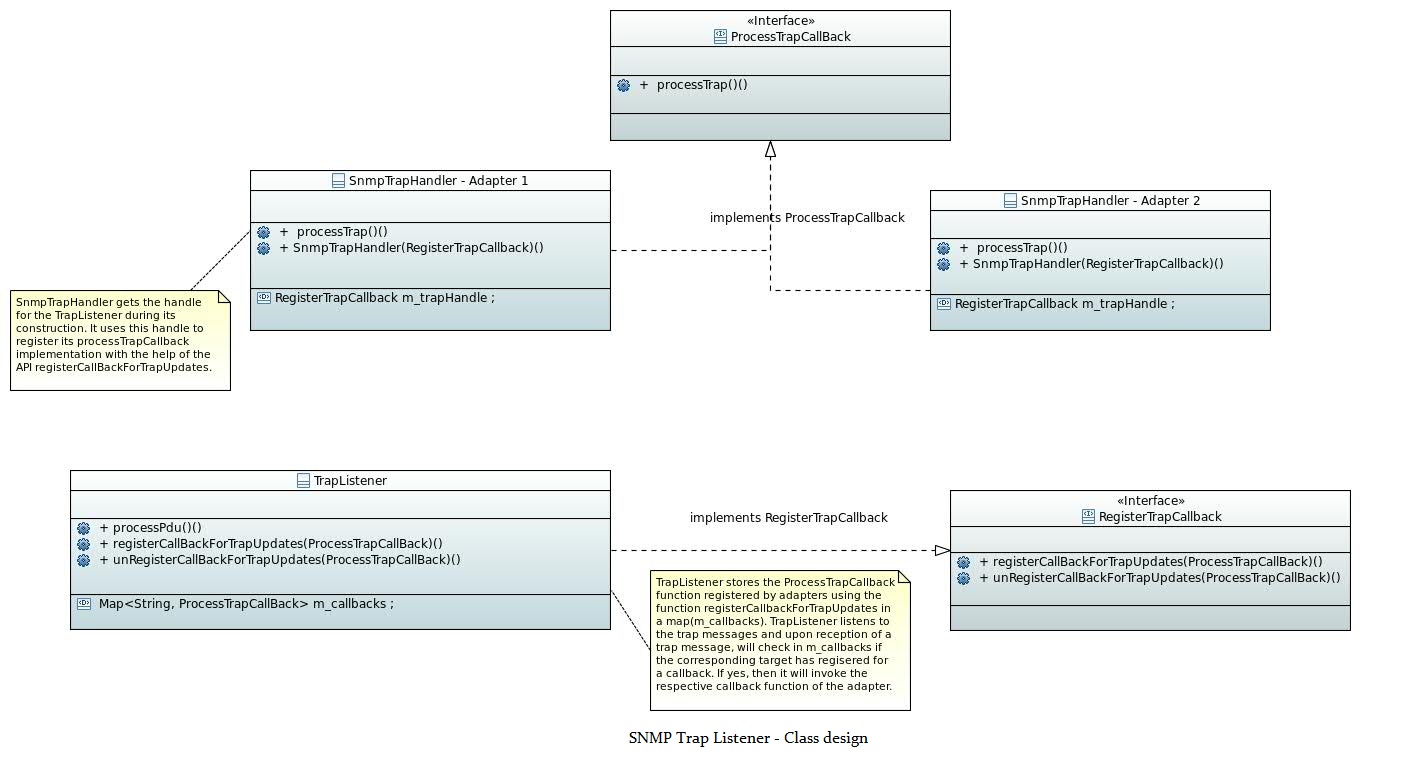
Interfaces
-
[RegisterTrapCallback]{.underline} - This interface is implemented by the TrapListener. The VDAs, upon creation of a new device, will use this interface to register a callback(ProcessTrapCallback) with the TrapListener.
-
[ProcessTrapCallback]{.underline} - This interface should be implemented by each SNMP VDA. The basis on how a trap should be processed by each adapter might differ based on the trap definition on the AN. So, only the adapter knows how to process the traps it received. An instance of ProcessTrapCallback will be created by the VDA during the device creation. The VDA should register this instance along with the source IP of the device with the TrapListener using the interface RegisterTrapCallback. The TrapListener will trigger this callback(ProcessTrapCallback) if the source IP of the incoming trap message matches with the one of the source IPs of the callbacks registered.
Classes
-
[TrapListener]{.underline} - This is the entry point for the common trap listener. During system startup an object of this class will be constructed. This will spawn a separate thread to listen on the default trap port 162. The library SNMP4j has wrappers implemented to facilitate a trap listener functionality. Please refer the official SNMP4j page to understand this in detail.
-
[SnmpTrapHandler]{.underline} - This is the trap handler at the adapter. It defines how to process the trap by implementing the interface ProcessTrapCallback. It registers this interface with the TrapListener by using the interface RegisterTrapCallback. Further this class is responsible for forwarding the NETCONF notification (formed from the trap message) to the BAA using the interface NonNCNotificationHandler.
Example RPC messages
Deploy/Undeploy Adapters
<rpc xmlns="urn:ietf:params:xml:ns:netconf:base:1.0" message-id="10101">
    <action xmlns="urn:ietf:params:xml:ns:yang:1">
        <deploy-adapter xmlns="urn:bbf:yang:obbaa:device-adapters">
            <deploy>
                <adapter-archive>sample-OLT-protocolsnmp-1.0.kar</adapter-archive>
            </deploy>
        </deploy-adapter>
    </action>
</rpc>

<rpc xmlns="urn:ietf:params:xml:ns:netconf:base:1.0" message-id="10101">
    <action xmlns="urn:ietf:params:xml:ns:yang:1">
        <undeploy-adapter xmlns="urn:bbf:yang:obbaa:device-adapters">
            <undeploy>
                <adapter-archive>sample-OLT-protocolsnmp-1.0.kar</adapter-archive>
            </undeploy>
        </undeploy-adapter>
    </action>
</rpc>
Create an SNMPv2 devices
<rpc xmlns="urn:ietf:params:xml:ns:netconf:base:1.0" message-id="1">
    <edit-config>
        <target>
            <running />
        </target>
        <config>
            <network-manager xmlns="urn:bbf:yang:obbaa:network-manager">
                <managed-devices>
                    <device xmlns:xc="urn:ietf:params:xml:ns:netconf:base:1.0" xc:operation="create">
                        <name>[DEVICE NAME]</name>
                        <device-management>
                            <type>OLT</type>
                            <interface-version>1.0</interface-version>
                            <vendor>sample</vendor>
                            <model>protocolsnmp</model>
                            <device-connection>
                                <connection-model>snmp</connection-model>
                                <snmp-auth>
                                    <snmp-authentication>
                                        <address>[IP ADDRESS]</address>
                                        <agent-port>[AGENT PORT]</agent-port>
                                        <snmp-version>v2c</snmp-version>
                                        <community-string>[COMMUNITY STRING]</community-string>
                                    </snmp-authentication>
                                </snmp-auth>
                            </device-connection>
                        </device-management>
                    </device>
                </managed-devices>
            </network-manager>
        </config>
    </edit-config>
</rpc>
Create an SNMPv3 devices
<rpc xmlns="urn:ietf:params:xml:ns:netconf:base:1.0" message-id="1">
    <edit-config>
        <target>
            <running />
        </target>
        <config>
            <network-manager xmlns="urn:bbf:yang:obbaa:network-manager">
                <managed-devices>
                    <device xmlns:xc="urn:ietf:params:xml:ns:netconf:base:1.0" xc:operation="create">
                        <name>[DEVICE NAME]</name>
                        <device-management>
                            <type>OLT</type>
                            <interface-version>1.0</interface-version>
                            <vendor>sample</vendor>
                            <model>protocolsnmp</model>
                            <device-connection>
                                <connection-model>snmp</connection-model>
                                <snmp-auth>
                                    <snmp-authentication>
                                        <address>172.18.19.230</address>
                                        <agent-port>161</agent-port>
                                        <snmp-version>v3</snmp-version>
                                        <snmpv3-auth>
                                           <user-name>user</user-name>
                                           <security-level>[SECURITY LEVEL, eg:authPriv]</security-level>
                                           <auth-protocol>[AUTHENTICATION PRTOCOL, eg:AuthSHA]</auth-protocol>
                                           <auth-password>[AUTHENTICATION PASSPHRASE, eg:my_authpass]</auth-password>
                                           <priv-protocol>[PRIVACY PRTOCOL, eg:PrivAES]</priv-protocol>
                                           <priv-password>[PRIVASY PASSPHRASE, eg:my_privpass]</priv-password>
                                        </snmpv3-auth>
                                    </snmp-authentication>
                                </snmp-auth>
                            </device-connection>
                        </device-management>
                    </device>
                </managed-devices>
            </network-manager>
        </config>
    </edit-config>
</rpc>
Set the System Location
<rpc xmlns="urn:ietf:params:xml:ns:netconf:base:1.0" message-id="1527307907169">
    <edit-config>
        <target>
            <running/>
        </target>
        <config>
            <network-manager xmlns="urn:bbf:yang:obbaa:network-manager">
                <managed-devices>
                    <device>
                        <name>[DEVICE NAME]</name>
                        <root>
                            <sys:system xmlns:sys="urn:ietf:params:xml:ns:yang:ietf-system">
                                    <sys:location>"[LOCATION]"</sys:location>
                            </sys:system>
                        </root>
                    </device>
                </managed-devices>
            </network-manager>
        </config>
    </edit-config>
</rpc>
Delete the device
<rpc xmlns="urn:ietf:params:xml:ns:netconf:base:1.0" message-id="1527307907464">
    <edit-config>
        <target>
            <running />
        </target>
        <config>
            <network-manager xmlns="urn:bbf:yang:obbaa:network-manager">
                <managed-devices>
                    <device xmlns:xc="urn:ietf:params:xml:ns:netconf:base:1.0" xc:operation="delete">
                        <name>[DEVICE NAME]</name>
                    </device>
                </managed-devices>
            </network-manager>
        </config>
    </edit-config>
</rpc>