
Setting up Simulators
OB-BAA uses the following simulators for simulating control of a device via the BAA layer NBI:
- Device Simulator => Simulates a NETCONF device. OB-BAA connects to
the device via NETCONF and deploys the instructions passed on to it
by Controller.
- pOLT Simulator => Simulates the physical OLT for interactions between the OLT and the BAA layer.
-
Controller Simulator => Simulates a SDN M&C. Connects to OB-BAA via its Northbound NETCONF protocol adapter.
- ONU Simulator => For simulating ONU functionality related with processing and responding to OMCI messages. The ONU simulator can also be used to test the scale of the BAA layer.
These simulators are loaded with the YANG modules that are to be tested or demonstrated.
Device Simulator
Netopeer2 is used as NETCONF device simulator for OB-BAA project (https://github.com/CESNET/Netopeer2).
System Requirements
For lab setup and trials that require one device simulator, the device simulator can be installed into the same virtual machine as the OB-BAA project's baa docker container. If there are multiple device simulators used in the lab or trial each device simulator has the requirement of 1 (vCPU), 1 GB RAM and 5 GB HDD.
Installation and Execution
In this release, the NETCONF device simulator must be built using the legacy branch of Netopeer2 with the associated dependencies that are located in the resources/simulators/device/netconf-simulator.zip file of the BAA distribution.
The resources/simulators/device/netconf-simulator.zip file also includes the source code of an application to generate ietf-alarms. After building the docker image, the simulator will be available at /opt/dev/trap-simulator in the docker container.
To build the simulator, the file must first be unzipped (the location where the file is unzipped is not important). After unzipping the file, a netconf-simulator directory will be created.
Alternatively the directories and source code under netconf-simulator/src can be replaced by pulling the code directly from the legacy branch of the Netopeer2.
1.To build the docker image:

    Go to the netconf-simulator directory generated by unzipping the netconf-simulator.zip file

2. Run the commands:

    find . -name \*.sh -exec chmod 755  {} \; -print

    find . -name \*.sh.in -exec chmod 755 {} \; -print

    docker build . -f netopeer2.dockerfile -t netopeer2:legacy

    This step is only necessary because there isn't a publicly available docker
    image from the netopeer2 legacy branch

3. Run the command:

    docker build . -f simulator.dockerfile -t netconf-simulator

To run the simulator (example):

    docker run -d --network="baadist_default" -p 830:830 --name sysrepo netconf-simulator
Known limitations:
-
If the docker image is built from the source code in the legacy branch, get-config commands will not work but the device will get aligned in OB-BAA.
-
If the docker image is built from the sysrepo/sysrepo-netopeer2:v0.7.7 docker image, the ietf-alarm simulator will not work.
Setting up a Device Simulator for callhome
The Device simulator can be configured to be as a device that supports the "callhome" connection method for the BAA layer.
Info: To determine which devices have completed the callhome procedure can be obtained by sending the following:
<rpc message-id="10101" xmlns="urn:ietf:params:xml:ns:netconf:base:1.0">
    <get>
        <filter type="subtree">
          <network-manager xmlns="urn:bbf:yang:obbaa:network-manager">
            <new-devices xmlns="urn:bbf:yang:obbaa:network-manager"/>
          </network-manager>
        </filter>
     </get>
</rpc>
The procedure to setup the simulator to support a "callhome" device is as follows:
Warning: The instructions in this section use sample certificates and private keys and are used for testing only. These files are included in the distribution of OB-BAA and can easily be compromised if used in real deployments. Do not use these certificates and private keys in actual deployments.
-
Create TLS certificates
The OB-BAA code base includes script to generate sample certificates that can be found under obbaa/baa-dist/generateDeviceDuidTLSFiles.sh.
Command: ./generateDeviceDuidTLSFiles.sh <DUID>
Example: ./generateDeviceDuidTLSFiles.sh DPU1
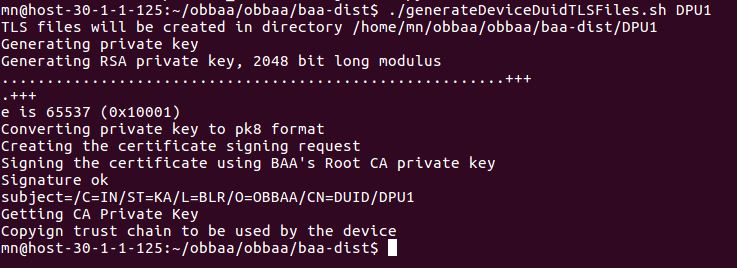
Upon running the script the certificates will be generated under a new folder with the provided DUID (e.g., DPU1).
-
Start the sysrepo netopeer2 docker service as discussed in the "Installation and Execution" section.
-
Login to the sysrepo docker container
docker exec -it sysrepo bash
- Using the builtin NETCONF client (netopeer2-cli) to configure callhome
# netopeer2-cli

-
From netopeer2-cli in the sysrepo docker container connect to netopeer-server.
Note: The default ssh username/password of netopeer2 is netconf/netconf.
connect \--ssh \--login netconf
- From netopeer2-cli in the sysrepo docker container, load the server private key using user-rpc command. This brings up a vi editor where the action request needs to be keyed in.
user-rpc <return>
- Load the private key by typing in an action "load-private-key" in the format provided below. Once done close using ":wq!" (vi command for save & quit). Successful execution will return "OK"
<?xml version="1.0" encoding="UTF-8"?>
<action xmlns="urn:ietf:params:xml:ns:yang:1">
  <keystore xmlns="urn:ietf:params:xml:ns:yang:ietf-keystore">
    <private-keys>
      <load-private-key>
        <name>[name the private key]</name>
        <private-key>[Copy the contents of private key (DPU1.key in example)
        here without the BEGIN and END]</private-key>
      </load-private-key>
    </private-keys>
  </keystore>
</action>
Below is an example of how to load the private key for the DPU server (e.g., DPU1.key):
<action xmlns="urn:ietf:params:xml:ns:yang:1">
<keystore xmlns="urn:ietf:params:xml:ns:yang:ietf-keystore">
<private-keys>
<load-private-key>
<name>DPU_server_key</name>
<private-key>MIIEpAIBAAKCAQEAtp/X2lHNVLi6G6a+AiAH8Rg2J/YpidA2C/jerc5uqerM/ihD
nqN+OVI8ErukpEuQ5d7PTzU3CnDiB8zAPDN/+9mR2L4FM9nlklieXeI8LHGjI5/E
P5JLmVA7HpRzL4yGWFS4PyL+e8ly3PGNpAQyOm5tRlPbTKi8PJvTLXTkVGhh+ZYX
fcMGVLoP0riPsYrZkjWVLIrnhz4n5sdniEzUDOg3Q0aQWqKnIc407cpU4zfd3zvV
Q8lMVpZIRDqFT82OMosSovJPUm/qQ/+BUihy2RZ0IkyfwuYB+aqUtl9lIRQG3mfN
rraeCuEJ5jsf+weQ61McTg2x0oB/v+VOMCMAbQIDAQABAoIBAB1RUdy5jyYPtcjk
ntJGhB/fTCpkKUz3gQWxAUaTwk5C5H/UxO49vvDC0+QJ/admfi948nz7xQdHEfJA
m4fOmLg8uF48OyeUzncNBPd7bz+PSqpYZq/x83L8X1FMcaVrgNHDYAS6wHHs6CSy
HpP7HHkm6yIEKkuHNxjfxyof/tvR1EjSka3MHL9L38mGQTATCMLGRgEjHCefSgsE
o5ACs5NmhfkAJDsBDvBp6kLUKk2RwchaDjz58f6HgXkiGEgeUNDTnWU6SXnv6zmw
/9KmXMMBO8gG4upYe250pHKfLRP5Kk+0Sg6efstgCagM9sTpCTuEUpay8PN2/awJ
3mpIi2ECgYEA70z1COAPpwgpOeTIIqWIPSDlN17KL3pSdMLPP9BWMRlqq07k2G7V
V3MFMP4RWllfLfifVhsBuOWWQod1uRTJTAG46qjLy9tVkG7XxUEDdK3MVnYPI/Yr
5WwrttO1IP+lpsRfC41KRciuF2iZPqWwKVV9sTHHmIVZafeejM5EINUCgYEAw15h
S1cqnI7Otew8IXZ7npzkaND2Pi0y53jGbh7Ve0+1FpZVqxgtU+3uWVlWsoV3FO0D
v6Oawa9/YKbOpGrvy/Tng7a1hYctTUMn8OzcTWLXGjYXNda3x/Nr9oDViUeBWP/1
sAeRotcXpUhBrLrigkOsoonzbR3BOg+hPHOJbTkCgYEAl9IgZ+gXpiZUWYmfu/N/
cyDqq+10oxidNbze1iKsfGwes97S68mtitTLh2C5y7OF4lmpZWyu9AqdAUqF0s2w
RIuXMTG0UnquV3srY9cyhRU63eP7CRrGkMDHHzBD61KmWx6dGmwiohGG+gz/pLJk
CGVX4FKvykFYEBXsvnKi4J0CgYAolj/iNf6dPbHF64jmbsXpwrBU8ixl6F/t5JJc
qD0ze/Cj+6FahRBNol1k5IF1XvLJPyALPQLWgA4XVzAQykJ8/ajnHRsC3X1U0sHG
dH6j+Qe0403ZGn1dpb1lHYi/F0LQ6YPyCPCBguvfo245Yy3RYBvKPJx8q7TLyhl2
BI6lSQKBgQDbiJQukEOHJnDkhUKerGIEGfwEVdNpkFgUN/Qcu7Y63Lp3SDeQr0ne
xkAmsUiC/rRt/njelMvopUaXqaSqPM3d7didD0Hx6ZDTs6wCzm06UtdsvLGne1If
nzVIO6JFSbMbrGCnce/YDyfe3RYIZoiTUZot7/rSnWseScmAygX1gA==</private-key>
</load-private-key>
</private-keys>
</keystore>
</action>
- From netopeer2-cli in the sysrepo docker container, load certificates using edit-config. This command brings up a vi editor.
edit-config --target running --config <return>
- Add the certificates following code snippet format below. Once done close using ":wq!" (vi command for save & quit). Successful execution will return "OK"
<keystore xmlns="urn:ietf:params:xml:ns:yang:ietf-keystore">
  <private-keys>
    <private-key>
      <name>[use the same private key name from above here]</name>
      <certificate-chains>
        <certificate-chain>
          <name>[name the cert name]</name>
          <certificate>[Copy the contents of DPU1_certchain.crt here without
          the BEGIN and END]</certificate>
        </certificate-chain>
      </certificate-chains>
    </private-key>
  </private-keys>
  <trusted-certificates>
    <name>[name the trust list]</name>
    <trusted-certificate>
      <name>[name the trust ca]</name>
      <certificate>[Copy the contents of trustchain.pem here without the
      BEGIN and END]</certificate>
    </trusted-certificate>
  </trusted-certificates>
</keystore>
Below is an example of how to load the certificate and trust chains for the DPU server (e.g., DPU1.cert, BAA CA certificate):
<keystore xmlns="urn:ietf:params:xml:ns:yang:ietf-keystore">
<private-keys>
<private-key>
<name>DPU_server_key</name>
<certificate-chains>
<certificate-chain>
<name>DPU_server_cert</name>
<certificate>MIIDAzCCAesCCQDXuKt20sxNuzANBgkqhkiG9w0BAQsFADA5MQswCQYDVQQGEwJJ
TjELMAkGA1UECAwCS0ExDDAKBgNVBAcMA0JMUjEPMA0GA1UECgwGT0ItQkFBMCAX
DTE4MDcyNjEwNDgxM1oYDzMzODcwNzA5MTA0ODEzWjBMMQswCQYDVQQGEwJJTjEL
MAkGA1UECAwCS0ExDDAKBgNVBAcMA0JMUjEOMAwGA1UECgwFT0JCQUExEjAQBgNV
BAMMCURVSUQvRFBVMTCCASIwDQYJKoZIhvcNAQEBBQADggEPADCCAQoCggEBALaf
19pRzVS4uhumvgIgB/EYNif2KYnQNgv43q3ObqnqzP4oQ56jfjlSPBK7pKRLkOXe
z081Nwpw4gfMwDwzf/vZkdi+BTPZ5ZJYnl3iPCxxoyOfxD+SS5lQOx6Ucy+MhlhU
uD8i/nvJctzxjaQEMjpubUZT20yovDyb0y105FRoYfmWF33DBlS6D9K4j7GK2ZI1
lSyK54c+J+bHZ4hM1AzoN0NGkFqipyHONO3KVOM33d871UPJTFaWSEQ6hU/NjjKL
EqLyT1Jv6kP/gVIoctkWdCJMn8LmAfmqlLZfZSEUBt5nza62ngrhCeY7H/sHkOtT
HE4NsdKAf7/lTjAjAG0CAwEAATANBgkqhkiG9w0BAQsFAAOCAQEAnzArkupGHm7s
hX2iNZdBZFUEVWbkgJTke0iO17VuntH+lCpCaMfu+MMKhKzILnO3F7ebyLS+r+YG
Fzxd0/KHLNPcFUJTDtout1JyuiRrR5SEb4fgETrLlJBKXq/Rs/7vdbmkcu7hJTb/
S4BV9866/BO8DVvt/RYz55IZ9xYPIcgxtxEQS2nRpc3EgN73iDE7sK6Hf6GEG78C
m90mb9EYETPjB/xcQSr9Ecea3GDkx9YYZVil3YdV9hJXEZHhkN7pzLR0HRhemWDD
kyY+R7//metm9BJzruaSEqguqXVGuYgbSyanlCDF8Lwe8WlEAB4jTfmXcXRzHW9e
S2Tv09/y8Q==</certificate>
</certificate-chain>
</certificate-chains>
</private-key>
</private-keys>
<trusted-certificates>
<name>DPU_trusted_ca_list</name>
<trusted-certificate>
<name>test_ca</name>
<certificate>MIIDRTCCAi2gAwIBAgIJAL6nrHtB9RlEMA0GCSqGSIb3DQEBCwUAMDkxCzAJBgNV
BAYTAklOMQswCQYDVQQIDAJLQTEMMAoGA1UEBwwDQkxSMQ8wDQYDVQQKDAZPQi1C
QUEwHhcNMTgwNzEwMDQyODUwWhcNMjEwNDI5MDQyODUwWjA5MQswCQYDVQQGEwJJ
TjELMAkGA1UECAwCS0ExDDAKBgNVBAcMA0JMUjEPMA0GA1UECgwGT0ItQkFBMIIB
IjANBgkqhkiG9w0BAQEFAAOCAQ8AMIIBCgKCAQEAuV1gWjWTXFWCbBCYe8vkt3Wb
KQWazG1CaJdCE+HMem62dUGSNyN29N6OdoaPot3eEzBNbiox+N3aSkX6+5078px4
GkxKDTiQf4Tw119g7JICDCD4YeYzYUat35N3XsLsrL9ua8svfDCn7UNxasI29HsX
60vH7ip9F9Mh+BvA0k8f++6ylXeNJbu5Re7pyMt9y5E6W0WOGOnvOrmj546QhshL
PtMin0+VaYfOu6p/YOOIdfadjv5i3zxeD+MGUO8F0Vv1NLTv+DpxzldK9gMlLaud
+WzZqMyrnFu3qlnYRej6dq171BiNtBc0ebJl8bbHl/8vlfWIE/oOUv8sPvd4QwID
AQABo1AwTjAdBgNVHQ4EFgQUbRVtFVtOGue/yIfclQ9cEOzhpBkwHwYDVR0jBBgw
FoAUbRVtFVtOGue/yIfclQ9cEOzhpBkwDAYDVR0TBAUwAwEB/zANBgkqhkiG9w0B
AQsFAAOCAQEAjJ/qvSXreYE2AGs8tZ121ubk+laD+ADpq+EtvpVpkCcGHKGSSGvW
4r1wDtrMGKLKKzwMIkFIK1Bwka5bIC5Jo7c/oRVt1djVScSkCmL/4z4fGRei5iGy
FK6hTTtDfoxvht+/ILEeOFsDTJSWMHFOfjkdH/DKekrS03wqS9GVawUZboRaoSi3
c110ZSJag2QcyveWbvRbMTvk1jjoPakTnFK7HTiTv+XxheLJL4WOn1Mhj+iksP/v
ZFs7XY38w/1AgA8gGGh9exfD28MpxjnO+xAgkTufuW+KB+82lXf1geoCzGoV7S2R
KBKGYUlmDh7SJaQO0x3fGwFz84IQhgZvxA==</certificate>
</trusted-certificate>
</trusted-certificates>
</keystore>
- Enable callhome by performing an edit-config (explained in an earlier step) and executing code-snippet sample below:
<netconf-server xmlns="urn:ietf:params:xml:ns:yang:ietf-netconf-server">
  <call-home>
    <netconf-client>
      <name>[Name the client]</name>
      <tls>
        <endpoints>
          <endpoint>
            <name>[name the end-point]</name>
            <address>[obbaa callhome address]</address>
            <port>[obbaa callhome port]</port>
          </endpoint>
        </endpoints>
        <certificates>
          <certificate>
            <name>[use the same server cert name]</name>
          </certificate>
        </certificates>
        <client-auth>
          <trusted-ca-certs>[use the same trust list name]</trusted-ca-certs>
          <cert-maps>
            <cert-to-name>
              <id>1</id>
              <fingerprint>[finger print of the obbaa certificate]</fingerprint>
              <map-type xmlns:x509c2n=
"urn:ietf:params:xml:ns:yang:ietf-x509-cert-to-name">x509c2n:specified</map-type>
              <name>[user name]</name>
            </cert-to-name>
          </cert-maps>
        </client-auth>
      </tls>
      <connection-type>
        <persistent/>
      </connection-type>
    </netconf-client>
  </call-home>
</netconf-server>
- Obtain the fingerprint of obbaa certificate by using openssl command
openssl x509 -noout -fingerprint -sha256 -inform pem -in /obbaa/baa-dist/src/main/assembly/conf/tls/certchain.crt

This is a SHA256 fingerprint and we need to specify it by prefixing 04 in the
Below is an example of how to enable the callhome feature for the DPU:
<netconf-server xmlns="urn:ietf:params:xml:ns:yang:ietf-netconf-server">
  <call-home>
    <netconf-client>
      <name>[Name the client]</name>
      <tls>
        <endpoints>
          <endpoint>
            <name>[name the end-point]</name>
            <address>[obbaa callhome address]</address>
            <port>[obbaa callhome port]</port>
          </endpoint>
        </endpoints>
        <certificates>
          <certificate>
            <name>[use the same server cert name]</name>
          </certificate>
        </certificates>
        <client-auth>
          <trusted-ca-certs>[use the same trust list name]</trusted-ca-certs>
          <cert-maps>
            <cert-to-name>
              <id>1</id>
              <fingerprint>[finger print of the obbaa certificate]</fingerprint>
              <map-type xmlns:x509c2n=
"urn:ietf:params:xml:ns:yang:ietf-x509-cert-to-name">x509c2n:specified</map-type>
              <name>[user name]</name>
            </cert-to-name>
          </cert-maps>
        </client-auth>
      </tls>
      <connection-type>
        <persistent/>
      </connection-type>
    </netconf-client>
  </call-home>
</netconf-server>
Once these steps are complete - The device will then begin its callhome procedure and will appear in the BAA layer as a new device.
To check if the device has successfully completed the callhome procedure:
<rpc message-id="10101" xmlns="urn:ietf:params:xml:ns:netconf:base:1.0">
    <get>
        <filter type="subtree">
            <network-manager xmlns="urn:bbf:yang:obbaa:network-manager">
                <new-devices xmlns="urn:bbf:yang:obbaa:network-manager"/>
            </network-manager>
        </filter>
    </get>
</rpc>
Example response:
<rpc-reply xmlns="urn:ietf:params:xml:ns:netconf:base:1.0" message-id="10101">
<data>
<network-manager:network-manager xmlns:network-manager="urn:bbf:yang:obbaa:network-manager">
<new-devices xmlns="urn:bbf:yang:obbaa:network-manager">
<new-device>
<duid>DPU1</duid>
<device-capability>urn:ietf:params:xml:ns:yang:ietf-netconf-acm?module=ietf-netconf-acm&revision=2012-02-22</device-capability>
<device-capability>urn:ietf:params:xml:ns:yang:ietf-netconf-with-defaults?module=ietf-netconf-with-defaults&revision=2011-06-01</device-capability>
<device-capability>urn:ietf:params:netconf:capability:with-defaults:1.0?basic-mode=explicit&also-supported=report-all,report-all-tagged,trim,explicit</device-capability>
<device-capability>urn:ietf:params:xml:ns:yang:iana-crypt-hash?module=iana-crypt-hash&revision=2014-08-06</device-capability>
<device-capability>urn:ietf:params:xml:ns:yang:1?module=yang&revision=2017-02-20</device-capability>
<device-capability>urn:ietf:params:xml:ns:yang:ietf-interfaces?module=ietf-interfaces&revision=2014-05-08</device-capability>
<device-capability>urn:ietf:params:xml:ns:yang:iana-if-type?module=iana-if-type&revision=2014-05-08</device-capability>
<device-capability>urn:ietf:params:xml:ns:yang:ietf-yang-library?revision=2018-01-17&module-set-id=25</device-capability>
<device-capability>urn:ietf:params:xml:ns:yang:ietf-netconf-monitoring?module=ietf-netconf-monitoring&revision=2010-10-04</device-capability>
<device-capability>http://example.net/turing-machine?module=turing-machine&revision=2013-12-27</device-capability>
<device-capability>urn:ietf:params:netconf:capability:rollback-on-error:1.0</device-capability>
<device-capability>urn:ietf:params:netconf:capability:xpath:1.0</device-capability>
<device-capability>urn:ietf:params:netconf:capability:startup:1.0</device-capability>
<device-capability>urn:ietf:params:xml:ns:yang:ietf-x509-cert-to-name?module=ietf-x509-cert-to-name&revision=2014-12-10</device-capability>
<device-capability>urn:ietf:params:xml:ns:yang:ietf-yang-metadata?module=ietf-yang-metadata&revision=2016-08-05</device-capability>
<device-capability>urn:ietf:params:netconf:capability:writable-running:1.0</device-capability>
<device-capability>urn:ietf:params:xml:ns:yang:ietf-ip?module=ietf-ip&revision=2014-06-16</device-capability>
<device-capability>urn:ietf:params:netconf:capability:interleave:1.0</device-capability>
<device-capability>urn:ietf:params:xml:ns:yang:ietf-netconf-notifications?module=ietf-netconf-notifications&revision=2012-02-06</device-capability>
<device-capability>urn:ietf:params:xml:ns:netconf:base:1.0?module=ietf-netconf&revision=2011-06-01&features=writable-running,candidate,rollback-on-error,validate,startup,xpath</device-capability>
<device-capability>urn:ietf:params:xml:ns:netconf:notification:1.0?module=notifications&revision=2008-07-14</device-capability>
<device-capability>urn:ietf:params:xml:ns:netmod:notification?module=nc-notifications&revision=2008-07-14</device-capability>
<device-capability>urn:ietf:params:netconf:base:1.1</device-capability>
<device-capability>urn:ietf:params:netconf:base:1.0</device-capability>
<device-capability>urn:ietf:params:xml:ns:yang:ietf-yang-types?module=ietf-yang-types&revision=2013-07-15</device-capability>
<device-capability>urn:ietf:params:netconf:capability:notification:1.0</device-capability>
<device-capability>urn:ietf:params:netconf:capability:validate:1.1</device-capability>
<device-capability>urn:ietf:params:xml:ns:yang:ietf-system?module=ietf-system&revision=2014-08-06&features=,authentication,local-users</device-capability>
<device-capability>urn:ietf:params:netconf:capability:candidate:1.0</device-capability>
<device-capability>urn:ietf:params:xml:ns:yang:ietf-inet-types?module=ietf-inet-types&revision=2013-07-15</device-capability>
</new-device>
</new-devices>
</network-manager:network-manager>
</data>
</rpc-reply>
Controller Simulator
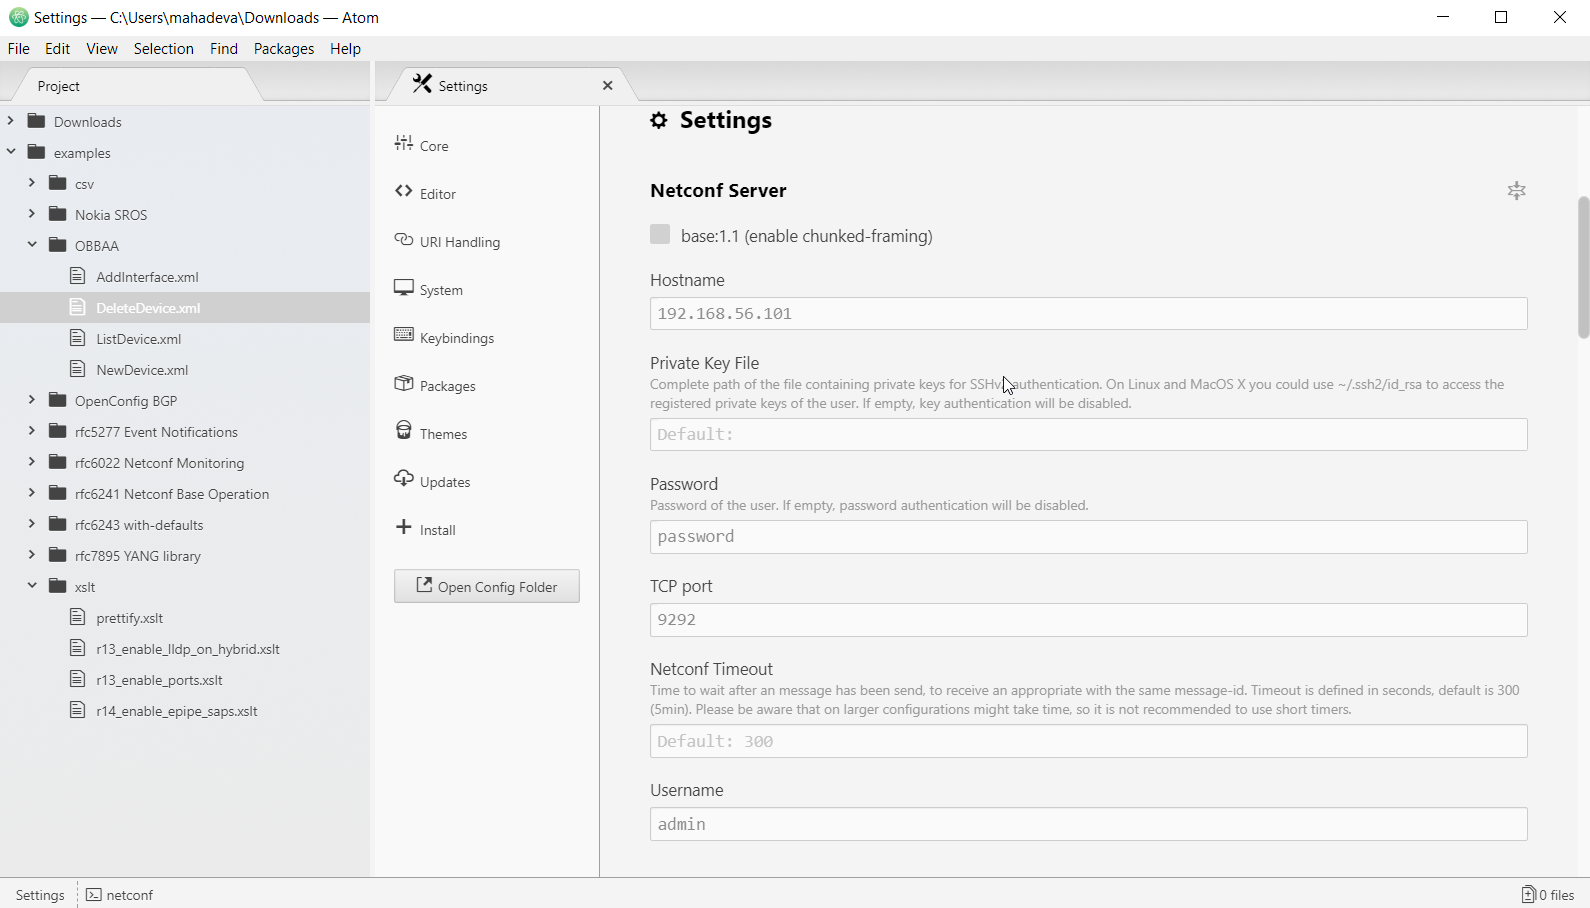
Use a NETCONF browser (http://www.mg-soft.com/download.html) or the Atom editor with NETCONF plug (https://atom.io/packages/atom-netconf) to simulate a SDN Controller over the OB-BAA NBI.
Using the NetConf server settings option, configure the Atom editor to point to the OB-BAA NETCONF server using the settings defined in the "Using OBBAA" section. The following fields need to appropriately updated in the setting:
-
Hostname : IP Address of OB-BAA server. By default BAA & sysrepo docker container listens in to all the network interfaces of the host server.
-
UserName : admin
-
Password : password
-
TCP Port : 9292
Click connect for the editor to connect to OB-BAA NETCONF server. As shown below the handshake Hello message should be visible. A snapshot of the Atom editor and the initial exchange with OB-BAA server is shown below.
Once the connection is established, additional NETCONF commands can be sent with the responses received in the Atom editor.
YANG modules
OB-BAA Network Manager YANG module
OB-BAA exposes a Network Manager YANG module which represents the aggregated BAA model that is available in the code base at resources/models/yang/aggregator-yang/bbf-obbaa-network-manager.yang
Sample Device YANG module
The OB-BAA code base provides example YANG module bundles that can be used for simulating different types of devices (e.g., DPU, OLT). These examples are available in the resources/examples/device-yang directory of the OB-BAA source code distribution.
Sample Alarm YANG module
An example vendor-alarms YANG module that can be used is described below:
module vendor-alarms {
   namespace "urn:vendorA:vendor-alarms";
   prefix vendor-alarms;

   import ietf-alarms {
      prefix al;
   }
   organization
      "vendor A";

   description
      "example vendor alarm module";

   revision 2019-11-21 {
      description
         "Initial revision.";
   }

   identity vendor-alarms {
      base al:alarm-type-id;
   }
   identity communications-alarm {
      base vendor-alarms;
   }
   identity los {
      base communications-alarm;
   }
   identity link-down {
      base communications-alarm;
   }
   identity sfp-fail {
      base communications-alarm;
   }
}
Simulate a new Device
Once the Controller (NBI) and Device (SBI) simulators are setup, the next step is to first create a device in BAA layer and execute commands on the device.
The following sections contains information to execute commands from the Controller simulator to the BAA layer to configure and maintain a Device.
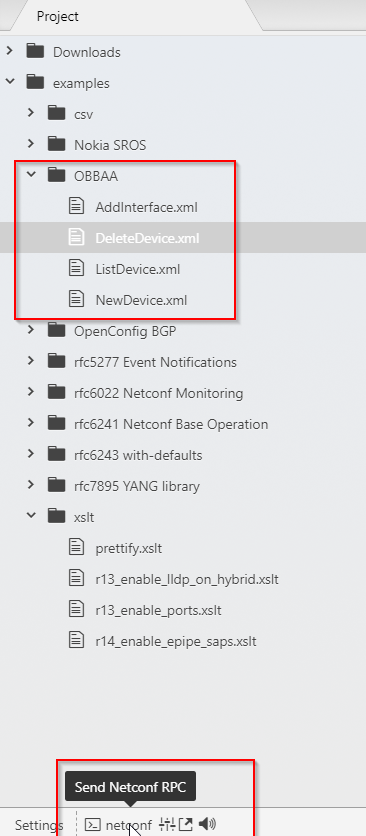
To try the commands with a Controller simulator using Atom, copy the request command of each use-case into a dedicated xml file and execute it from Atom NETCONF editor (illustration below).
Create Device
Create In Direct Connection mode
When creating a device in direct connection mode the IP address and port of the device is needed as well as the SSH username and password.
For simulators that reside in a docker container using these instructions, the management port of the simulated device is obtained via the command used to run the netopeer2 docker image. The IP address of the simulated device can be obtained using the following docker command:
docker network inspect baadist_default
Warning: The SSH credential for a simulated device uses the default sysrepo/netopeer2 configuration of "netconf/netconf". These credentials should be modified if used in environments than local lab testing.
Request:
<?xml version="1.0" encoding="UTF-8"?>
<rpc xmlns="urn:ietf:params:xml:ns:netconf:base:1.0" message-id="1527307907656">
  <edit-config>
    <target>
      <running />
    </target>
    <config>
      <network-manager xmlns="urn:bbf:yang:obbaa:network-manager">
        <managed-devices>
          <device xmlns:xc="urn:ietf:params:xml:ns:netconf:base:1.0" xc:operation="create">
            <name>deviceA</name>
            <device-management>
              <type>DPU</type>
              <interface-version>1.0.0</interface-version>
              <vendor>Nokia</vendor>
              <model>4LT</model>
              <device-connection>
                <connection-model>direct</connection-model>
                <password-auth>
                  <authentication>
                    <address>192.168.169.1</address>
                    <!-- ip address of the device/simulator. Replace with the right ip -->
                    <management-port>830</management-port>
                    <!-- port number of device/simulator NC server. -->
                    <user-name>netconf</user-name>
                    <!-- username of device NC server -->
                    <password>netconf</password>
                    <!-- password of device NC server -->
                  </authentication>
                </password-auth>
              </device-connection>
            </device-management>
          </device>
        </managed-devices>
      </network-manager>
    </config>
  </edit-config>
</rpc>
Response:
<rpc-reply xmlns="urn:ietf:params:xml:ns:netconf:base:1.0" message-id="1527307907656">
  <ok/>
</rpc-reply>
Create In Call-home mode
Request:
<rpc xmlns="urn:ietf:params:xml:ns:netconf:base:1.0" message-id="1527307907656">
    <edit-config>
        <target>
            <running />
        </target>
        <config>
            <managed-devices xmlns="urn:bbf:yang:obbaa:network-manager">
                <device xmlns:xc="urn:ietf:params:xml:ns:netconf:base:1.0" xc:operation="create">
                    <name>Bangalore-Mayata-E2</name>
                    <device-management>
                        <type>DPU</type>
                        <interface-version>1.0.0</interface-version>
                        <vendor>Nokia</vendor>
                        <device-connection>
                            <connection-model>call-home</connection-model>
                            <duid>DPU1</duid>
                        </device-connection>
                    </device-management>
                </device>
            </managed-devices>
        </config>
    </edit-config>
</rpc>
Response:
<rpc-reply xmlns="urn:ietf:params:xml:ns:netconf:base:1.0" message-id="1527307907656">
  <ok/>
</rpc-reply>
Retrieve Device Information
Request:
<?xml version="1.0" encoding="UTF-8"?>
<rpc message-id="10101" xmlns="urn:ietf:params:xml:ns:netconf:base:1.0">
    <get>
        <filter type="subtree">
            <network-manager xmlns="urn:bbf:yang:obbaa:network-manager">
                <managed-devices>
                    <device>
                        <name>deviceA</name>
                    </device>
                </managed-devices>
            </network-manager>
        </filter>
    </get>
</rpc>
Response:
<rpc-reply xmlns="urn:ietf:params:xml:ns:netconf:base:1.0" message-id="10101">
  <data>
    <network-manager:network-manager xmlns:network-manager="urn:bbf:yang:obbaa:network-manager">
      <network-manager:managed-devices>
        <network-manager:device>
          <network-manager:name>deviceA</network-manager:name>
          <network-manager:device-management>
            <device-state xmlns="urn:bbf:yang:obbaa:network-manager">
              <configuration-alignment-state>Never Aligned</configuration-alignment-state>
              <connection-state>
                <connected>false</connected>
                <connection-creation-time>1970-01-01T00:00:00+00:00</connection-creation-time>
              </connection-state>
            </device-state>
            <network-manager:interface-version>1.0.0</network-manager:interface-version>
            <network-manager:model>4LT</network-manager:model>
            <network-manager:push-pma-configuration-to-device>true</network-manager:push-pma-configuration-to-device>
            <network-manager:type>DPU</network-manager:type>
            <network-manager:vendor>Nokia</network-manager:vendor>
            <network-manager:device-connection>
              <network-manager:connection-model>direct</network-manager:connection-model>
              <network-manager:password-auth>
                <network-manager:authentication>
                  <network-manager:address>192.168.169.1</network-manager:address>
                  <network-manager:management-port>830</network-manager:management-port>
                  <network-manager:password>netconf</network-manager:password>
                  <network-manager:user-name>netconf</network-manager:user-name>
                </network-manager:authentication>
              </network-manager:password-auth>
            </network-manager:device-connection>
          </network-manager:device-management>
        </network-manager:device>
      </network-manager:managed-devices>
    </network-manager:network-manager>
  </data>
</rpc-reply>
Update Device Configuration
When updating a device configuration it is important that any YANG modules referenced have been loaded into the BAA layer (see the instructions for Deploying YANG modules into the BAA layer) as well as the device. In the case of the simulated device using the docker container this would have happened when setup the simulator using the instructions on this page.
Request:
<rpc xmlns="urn:ietf:params:xml:ns:netconf:base:1.0" message-id="1527307907169">
    <edit-config>
        <target>
            <running/>
        </target>
        <config>
            <network-manager xmlns="urn:bbf:yang:obbaa:network-manager">
                <managed-devices>
                    <device>
                        <name>deviceA</name>
                        <root>
                            <if:interfaces xmlns:if="urn:ietf:params:xml:ns:yang:ietf-interfaces">
                                <if:interface xmlns:xc="urn:ietf:params:xml:ns:netconf:base:1.0" xc:operation="create">
                                    <if:name>interfaceB</if:name>
                                    <if:type xmlns:ianaift="urn:ietf:params:xml:ns:yang:iana-if-type">ianaift:ethernetCsmacd</if:type>
                                </if:interface>
                            </if:interfaces>
                        </root>
                    </device>
                </managed-devices>
            </network-manager>
        </config>
    </edit-config>
</rpc>
Response:
<rpc-reply message-id="1527307907664" xmlns="urn:ietf:params:xml:ns:netconf:base:1.0">
<ok/>
</rpc-reply>
Retrieve Device Configuration
Request:
<?xml version="1.0" encoding="UTF-8"?>
<rpc xmlns="urn:ietf:params:xml:ns:netconf:base:1.0" message-id="1527307907656">
    <get-config xmlns="urn:ietf:params:xml:ns:netconf:base:1.0">
        <source>
            <running/>
        </source>
        <filter type="subtree">
            <network-manager xmlns="urn:bbf:yang:obbaa:network-manager">
                <managed-devices>
                    <device>
                        <name>deviceA</name>
                        <root>
                            <if:interfaces xmlns:if="urn:ietf:params:xml:ns:yang:ietf-interfaces"/>
                        </root>
                    </device>
                </managed-devices>
            </network-manager>
        </filter>
    </get-config>
</rpc>
Response:
<data xmlns="urn:ietf:params:xml:ns:netconf:base:1.0">
	<managed-devices xmlns="urn:bbf:yang:obbaa:network-manager">
		<device>
			<device-name>deviceA</device-name>
			<root>
				<if:interfaces xmlns:if="urn:ietf:params:xml:ns:yang:ietf-interfaces">
					<if:interface>
			            <if:name>interfaceA</if:name>
			            <if:enabled>true</if:enabled>
			            <if:type xmlns:ianaift="urn:ietf:params:xml:ns:yang:iana-if-type">ianaift:ethernetCsmacd</if:type>
					</if:interface>
				</if:interfaces>
			</root>
		</device>
	</managed-devices>
</data>
Delete Device
Request:
<rpc xmlns="urn:ietf:params:xml:ns:netconf:base:1.0" message-id="1527307907464">
    <edit-config>
        <target>
            <running />
        </target>
        <config>
            <network-manager xmlns="urn:bbf:yang:obbaa:network-manager">
                <managed-devices>
                    <device xmlns:xc="urn:ietf:params:xml:ns:netconf:base:1.0" xc:operation="delete">
                        <name>deviceA</name>
                    </device>
                </managed-devices>
            </network-manager>
        </config>
    </edit-config>
</rpc>
Response:
<rpc-reply xmlns="urn:ietf:params:xml:ns:netconf:base:1.0" message-id="1527307907464">
  <ok/>
</rpc-reply>
Generate Alarms for a Device
In order to generate alarms for a device the device simulator requires the device simulator have the alarm notification YANG definitions.
#enter the docker container
docker exec -it sysrepo bash

#install the YANG module file with the notification definition.
sysrepoctl -i --yang=vendor-alarms.yang
Once the alarm notification are installed in the device simulator, the alarms are simulated by executing the trap-simulator with the alarm to be simulated.
#simulate the alarm
/opt/dev/trap-simulator --resource /ietf-interfaces:interfaces/interface[name=\'eth.0\'] \
--severity minor \
--alarm-text text \
--type-id vendor-alarms:los \
This will result in the following notification in the NETCONF client (ex: netopeer2-cli):
<notification xmlns="urn:ietf:params:xml:ns:netconf:notification:1.0">
  <eventTime>2020-01-17T15:32:01Z</eventTime>
  <alarm-notification xmlns="urn:ietf:params:xml:ns:yang:ietf-alarms">
    <resource xmlns:if="urn:ietf:params:xml:ns:yang:ietf-interfaces">/if:interfaces/if:interface[if:name='eth.0']</resource>
    <alarm-type-id xmlns:vendor-alarms="urn:vendorA:vendor-alarms">vendor-alarms:los</alarm-type-id>
    <alarm-type-qualifier> text </alarm-type-qualifier>
    <time>2019-07-25T05:51:36+00:00</time>
    <alarm-text>text</alarm-text>
    <perceived-severity>minor</perceived-severity>
  </alarm-notification>
</notification>